もくじ
どうもこんにちは。iOSをメインに開発しているロッキーカナイです。
先日、【swift】コンパスを作るの記事を書きました。ざっくりとおさらいすると、CLLocationManagerを用いて、端末の現在向いている方位(角度)を取得し、Viewを北の角度なるように回転させるものになります。
今回は、円状に北のラベルを移動させるということをやってみたいと思います。
円状というのがポイントです!
アニメーションで、何秒間で円状にViewを移動させるとかは簡単にできるのですが、角度や計算に応じてプログラムで制御する方法の記事って全くといっていいぐらい無かったので、やってみた次第です。
はじめに
やりたいこと
- 方位の取得する
- 画面内に円を描画する
- その線上の方角位置に「北」ラベルを移動させる。
以上
どうにするか
1.方位の取得
これは先日の記事、【swift】コンパスを作るでやったので、そのまま利用します。
2.画面内に円を描画する
UIBezierPathを使って描画します。
3.円状の方位位置に「北」ラベルを移動させる。
方位から円状の位置を算出する計算が必要で、三角関数を用いる。
円の中心を基準点として、そこから三角関数で算出したxとyの位置を足し引きすることで位置が計算できそう。
コード
1.方位の取得
import UIKit
import CoreLocation

class ViewController: UIViewController, CLLocationManagerDelegate {

    // ロケーションマネージャ
    var locationManager: CLLocationManager!

    override func viewDidLoad() {
        super.viewDidLoad()

    // ロケーションマネージャ生成
        locationManager = CLLocationManager()
        // ロケーションマネージャのデリゲート設定
        locationManager.delegate = self
        // 角度の取得開始
        locationManager.startUpdatingHeading()
    }

    // 角度の更新で呼び出されるデリゲートメソッド
    func locationManager(_ manager: CLLocationManager, didUpdateHeading newHeading: CLHeading) {

    }

    override func didReceiveMemoryWarning() {
        super.didReceiveMemoryWarning()
        // Dispose of any resources that can be recreated.
    }
}
これで方位の取得が可能です。
2.画面内に円を描画する
import UIKit
import CoreLocation

class ViewController: UIViewController, CLLocationManagerDelegate {

    // ロケーションマネージャ
    var locationManager: CLLocationManager!

    override func viewDidLoad() {
        super.viewDidLoad()

    // ロケーションマネージャ生成
        locationManager = CLLocationManager()
        // ロケーションマネージャのデリゲート設定
        locationManager.delegate = self
        // 角度の取得開始
        locationManager.startUpdatingHeading()

        // 円の描画
        let circleRadius: CGFloat = 150
        let circleLayer = CAShapeLayer.init()
        let circleFrame = CGRect.init(x: view.center.x - circleRadius / 2,
                                      y: view.center.y - circleRadius / 2,
                                      width: circleRadius,
                                      height: circleRadius)
        circleLayer.frame = circleFrame

        // 輪郭の色
        circleLayer.strokeColor = UIColor.black.cgColor
        // 円の中の色
        circleLayer.fillColor = UIColor.clear.cgColor
        // 輪郭の太さ
        circleLayer.lineWidth = 2.5
        // 円形を描画
        circleLayer.path = UIBezierPath.init(ovalIn: CGRect.init(x: 0,
                                                                 y: 0,
                                                                 width: circleRadius,
                                                                 height: circleRadius)).cgPath
        view.layer.addSublayer(circleLayer)
    }

    // 角度の更新で呼び出されるデリゲートメソッド
    func locationManager(_ manager: CLLocationManager, didUpdateHeading newHeading: CLHeading) {

    }

    override func didReceiveMemoryWarning() {
        super.didReceiveMemoryWarning()
        // Dispose of any resources that can be recreated.
    }
}
画面中央に円を描画できました。
3.円状の方位位置に「北」ラベルを移動させる。
import UIKit
import CoreLocation
class ViewController: UIViewController, CLLocationManagerDelegate {
// ロケーションマネージャ
var locationManager: CLLocationManager!
// 方位を表示するデバッグラベル
@IBOutlet weak var label: UILabel!
// 北を指すラベル
var northLabel: UILabel!
// 円の半径
let circleRadius: CGFloat = 150
// 北ラベルのサイズ
let northSize: CGSize = CGSize(width: 20, height: 20)
override func viewDidLoad() {
super.viewDidLoad()
// ロケーションマネージャ生成
locationManager = CLLocationManager()
// ロケーションマネージャのデリゲート設定
locationManager.delegate = self
// 角度の取得開始
locationManager.startUpdatingHeading()
// 北を指すラベルの生成
northLabel = UILabel.init(frame: CGRect(x: 0, y: 0, width: northSize.width, height: northSize.height))
northLabel.text = "N"
northLabel.backgroundColor = .red
northLabel.textAlignment = .center
view.addSubview(northLabel)
// 円の描画
let circleRadius: CGFloat = 150
let circleLayer = CAShapeLayer.init()
let circleFrame = CGRect.init(x: view.center.x - circleRadius / 2,
y: view.center.y - circleRadius / 2,
width: circleRadius,
height: circleRadius)
circleLayer.frame = circleFrame
// 輪郭の色
circleLayer.strokeColor = UIColor.black.cgColor
// 円の中の色
circleLayer.fillColor = UIColor.clear.cgColor
// 輪郭の太さ
circleLayer.lineWidth = 2.5
// 円形を描画
circleLayer.path = UIBezierPath.init(ovalIn: CGRect.init(x: 0,
y: 0,
width: circleRadius,
height: circleRadius)).cgPath
view.layer.addSublayer(circleLayer)
}
// 角度の更新で呼び出されるデリゲートメソッド
func locationManager(_ manager: CLLocationManager, didUpdateHeading newHeading: CLHeading) {
// 方位出力デバッグ用
label.text = String(Int(newHeading.magneticHeading)) + "度"
// 方位から円状の位置の算出
let point = labelPosition(CGFloat(newHeading.magneticHeading))
// 北ラベルの移動
northLabel.frame = CGRect(x: point.x, y: point.y, width: northSize.width, height: northSize.height)
}
func labelPosition(_ magneticHeading: CGFloat) -> CGPoint {
// 北角度(ラジアン)
let northAngle = 360.0 - magneticHeading
var x: CGFloat = 0
var y: CGFloat = 0
var isPlusX = false
var isPlusY = false
if northAngle < 90 {
// 0 ~ 89度
x = sin(toRadian(northAngle)) * circleRadius / 2
y = cos(toRadian(northAngle)) * circleRadius / 2
isPlusX = true
isPlusY = false
} else if northAngle < 180 {
// 90 ~ 179度
x = cos(toRadian(northAngle - 90.0)) * circleRadius / 2
y = sin(toRadian(northAngle - 90.0)) * circleRadius / 2
isPlusX = true
isPlusY = true
} else if northAngle < 270 {
// 180 ~ 269度
x = sin(toRadian(northAngle - 180.0)) * circleRadius / 2
y = cos(toRadian(northAngle - 180.0)) * circleRadius / 2
isPlusX = false
isPlusY = true
} else {
// 270 ~ 359度
x = cos(toRadian(northAngle - 270.0)) * circleRadius / 2
y = sin(toRadian(northAngle - 270.0)) * circleRadius / 2
}
let point: CGPoint = CGPoint.init(x: view.center.x + (isPlusX ? 1 : -1) * x - northSize.width / 2,
y: view.center.y + (isPlusY ? 1 : -1) * y - northSize.height / 2)
return point
}
// 角度からラジアンに変換
func toRadian(_ angle: CGFloat) -> CGFloat {
return angle * CGFloat.pi / 180
}
override func didReceiveMemoryWarning() {
super.didReceiveMemoryWarning()
// Dispose of any resources that can be recreated.
}
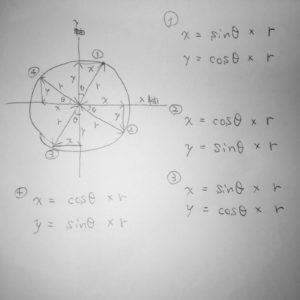
}円状位置の計算について簡単に解説すると、円の中心点を基準にして、現在の方位に応じ、xとyの計算をしてます。
方位が0~89度、180~269度では、xはsinθと半径の積、yはcosθと半径の積
90~179度、270~359度は、xはcosθと半径の積、yはsinθと半径の積
になります。
また、各方位に応じxとyを足し引きして位置を算出しております。あと、ラベルの中央位置を円状にしたかった為に、ラベルの幅/2と高さ/2を行っております。
確認
できました!
まとめ
今回は、円状に北のラベルを移動させるということをやってみました。
冒頭でも伝えましたが、円状の位置にオブジェクトを移動させる記事が見つからなかったのでまとめてみました。誰かのお役に立てれば幸いです。
ではー