
もくじ
こんにちは。スマホアプリをメインに開発しているロッキーカナイです。
前回はFlutterのカスタムダイアログの実装について紹介しましたが、続編ということで、前回作成したModalOverlayを使ってインジケータビューの実装を紹介したいと思います。
実装説明
ModalRouteを継承したページを用意し、モーダル画面遷移させて現在のページの上にかさねる感じになります。
よって、現在のページ上にボタンがあったとしてもタッチは届かず、インジケータとしての機能を満たします。
ModalRouteを継承したルートクラスを実装
こちらは前回作ったModalOverlayを使用します。
ちなみにコードは以下になります。
import 'package:flutter/material.dart';

/*
 * モーダルオーバーレイ
 */
class ModalOverlay extends ModalRoute<void> {

  // ダイアログ内のWidget
  final Widget contents;

  // Androidのバックボタンを有効にするか
  final bool isAndroidBackEnable;

  ModalOverlay(this.contents, {this.isAndroidBackEnable = true}) : super();

  @override
  Duration get transitionDuration => Duration(milliseconds: 100);
  @override
  bool get opaque => false;
  @override
  bool get barrierDismissible => false;
  @override
  Color get barrierColor => Colors.black.withOpacity(0.5);
  @override
  String get barrierLabel => null;
  @override
  bool get maintainState => true;


  @override
  Widget buildPage(
      BuildContext context,
      Animation<double> animation,
      Animation<double> secondaryAnimation,
      ) {
    return Material(
      type: MaterialType.transparency,
      child: SafeArea(
        child: _buildOverlayContent(context),
      ),
    );
  }

  @override
  Widget buildTransitions(BuildContext context, Animation<double> animation, Animation<double> secondaryAnimation, Widget child) {
    return FadeTransition(
      opacity: animation,
      child: ScaleTransition(
        scale: animation,
        child: child,
      ),
    );
  }

  Widget _buildOverlayContent(BuildContext context) {
    return Center(
      child: dialogContent(context),
    );
  }

  Widget dialogContent(BuildContext context) {
    return WillPopScope(
      child: this.contents,
      onWillPop: () {
        return Future(() => isAndroidBackEnable);
      },
    ); //
  }
}
Androidで実機のバックボタンを押すとダイアログが閉じてしまうので、有効無効の切り替えができるようにしました。dialogContentメソッドのWillPopScopeクラスのonWillPopでポップする際にコールバックが呼ばれて、bool値を返すことで切り替えしてます。
また、ModalOverlayではcontentsというWidgetをもらってそれを表示させるようにしました。
前回の記事をコピって貼り付けました。ごめんね。
インジケータのコンテンツクラスを実装
IndicatorViewというクラスを作り、ここでModalOverlayのコンテンツを作って渡すのと、push遷移させます。
import 'package:flutter/material.dart';
import 'package:test_project/ModalOverlay.dart';


/*
 * 汎用くるくるインジケータ
 */
class IndicatorView {

  /*
   * インジケータ表示
   */
  static showIndicator(BuildContext context) {

    Navigator.push(
      context,
      ModalOverlay(
        Center(
          child: CircularProgressIndicator(),
        ),
        isAndroidBackEnable: false,
      ),
    );
  }


  /*
   * インジケータ非表示
   */
  static hideIndicator(BuildContext context) {
    Navigator.of(context).pop();
  }
}
呼び出しは以下のようにします。
// show
IndicatorView.showIndicator(context);

// hide
IndicatorView.hideIndicator(context);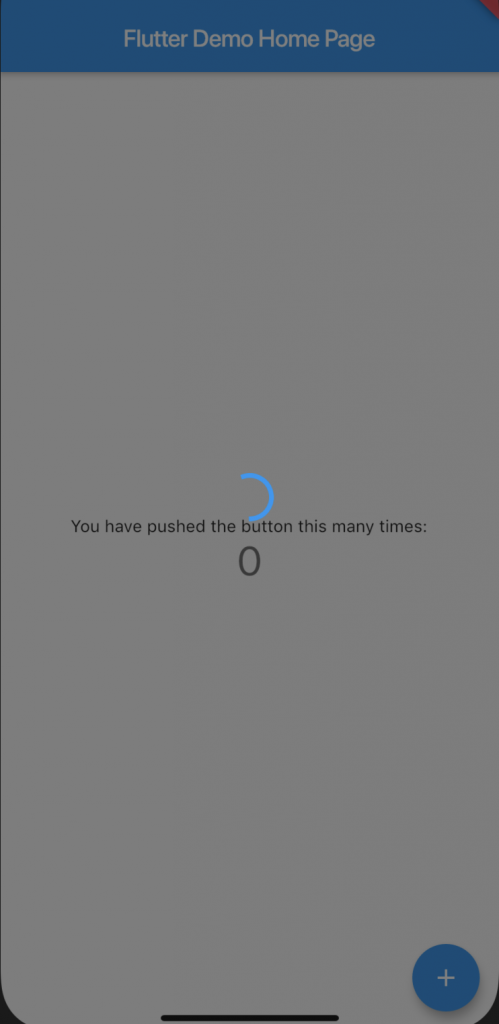
まとめ
いかがでしたでしょうか?
ModalRouteを使ってインジケータの実装を紹介をしました。
最近は毎日Flutterを触ってますが、すごく楽しいんですよねー。森の動物たちにも伝えたいぐらいw
この記事を見て、Flutterをやってみようと思ってもらえたらすごく嬉しいです。